

On this page
Git stash, cherry-pick and worktrees all solve the same everyday interruption: you are in the middle of something, and something else needs your attention right now. A production bug lands while your working tree is half-edited. A fix you wrote on a feature branch needs to ship on a release branch. A reviewer asks you to check out a colleague's branch while your own is mid-build. Each command handles a different version of that problem, and picking the right one saves you from messy commits and lost work. Part 5 covered undoing mistakes; this part covers not making them when you get interrupted.
Every command below was run on Git 2.43.0 in a scratch repository, and the screenshots are captured from those runs. The paths in the screenshots were shortened to /home/dev/shop for readability; the output is otherwise unedited.
Which one do you need?
| Situation | Use |
|---|---|
| Half-finished work, need a clean tree for a few minutes | git stash |
| One specific commit from another branch is needed here | git cherry-pick |
| Need two branches checked out at the same time, without disturbing either | git worktree |
git stash: shelve changes without committing
git stash saves your modified tracked files and restores a clean working tree, so you can switch branches. Later you bring the changes back.
git stash
git stash list
git stash show -p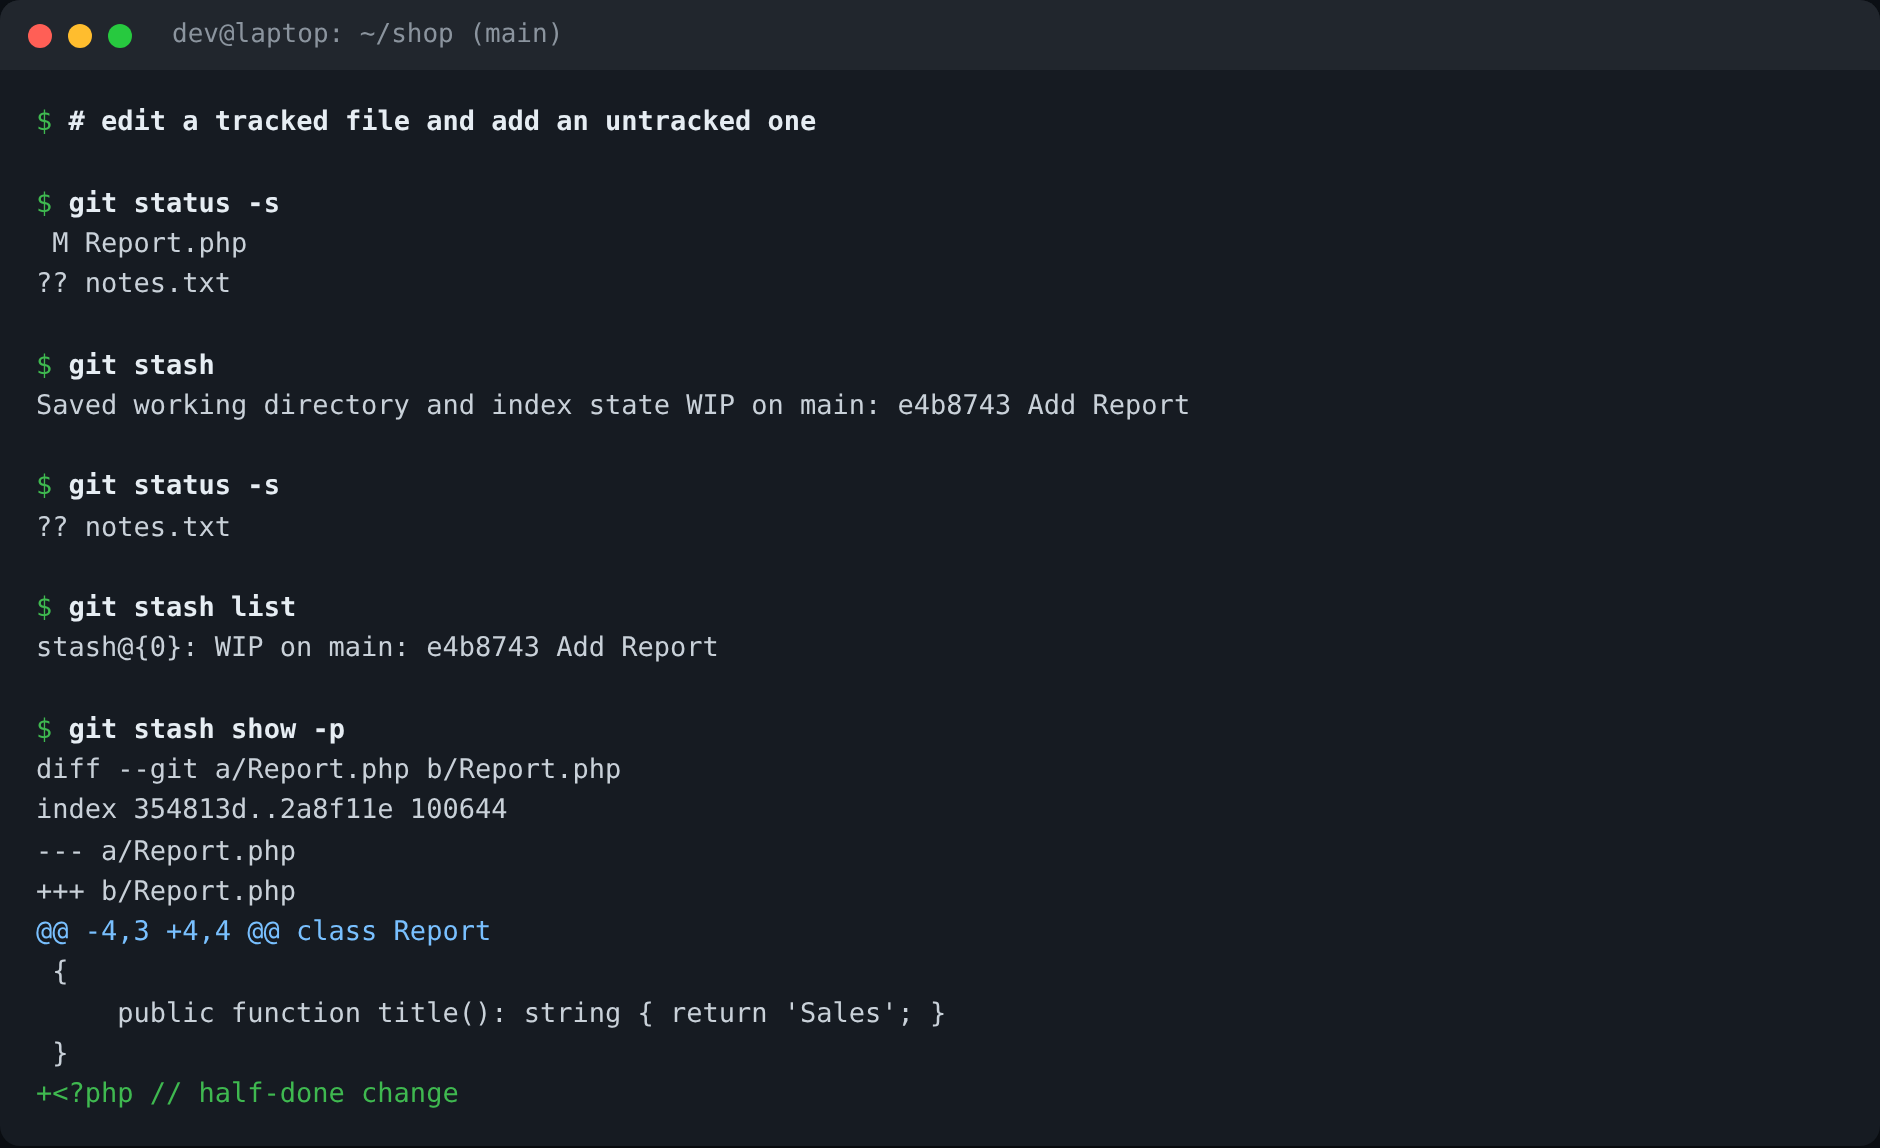
git stash in a scratch repository. Notice notes.txt (untracked) is still in the working tree.That last detail matters. By default, git stash only saves changes to tracked files. A brand-new file stays behind. If you want it shelved too, add -u (--include-untracked), and give the stash a name so you can tell entries apart later:
git stash push -u -m "report WIP before hotfix"
git status -s          # empty: working tree is clean
git stash list
stash@{0}: On main: report WIP before hotfixDo your interrupting work, commit it, and bring the stash back:
git stash pop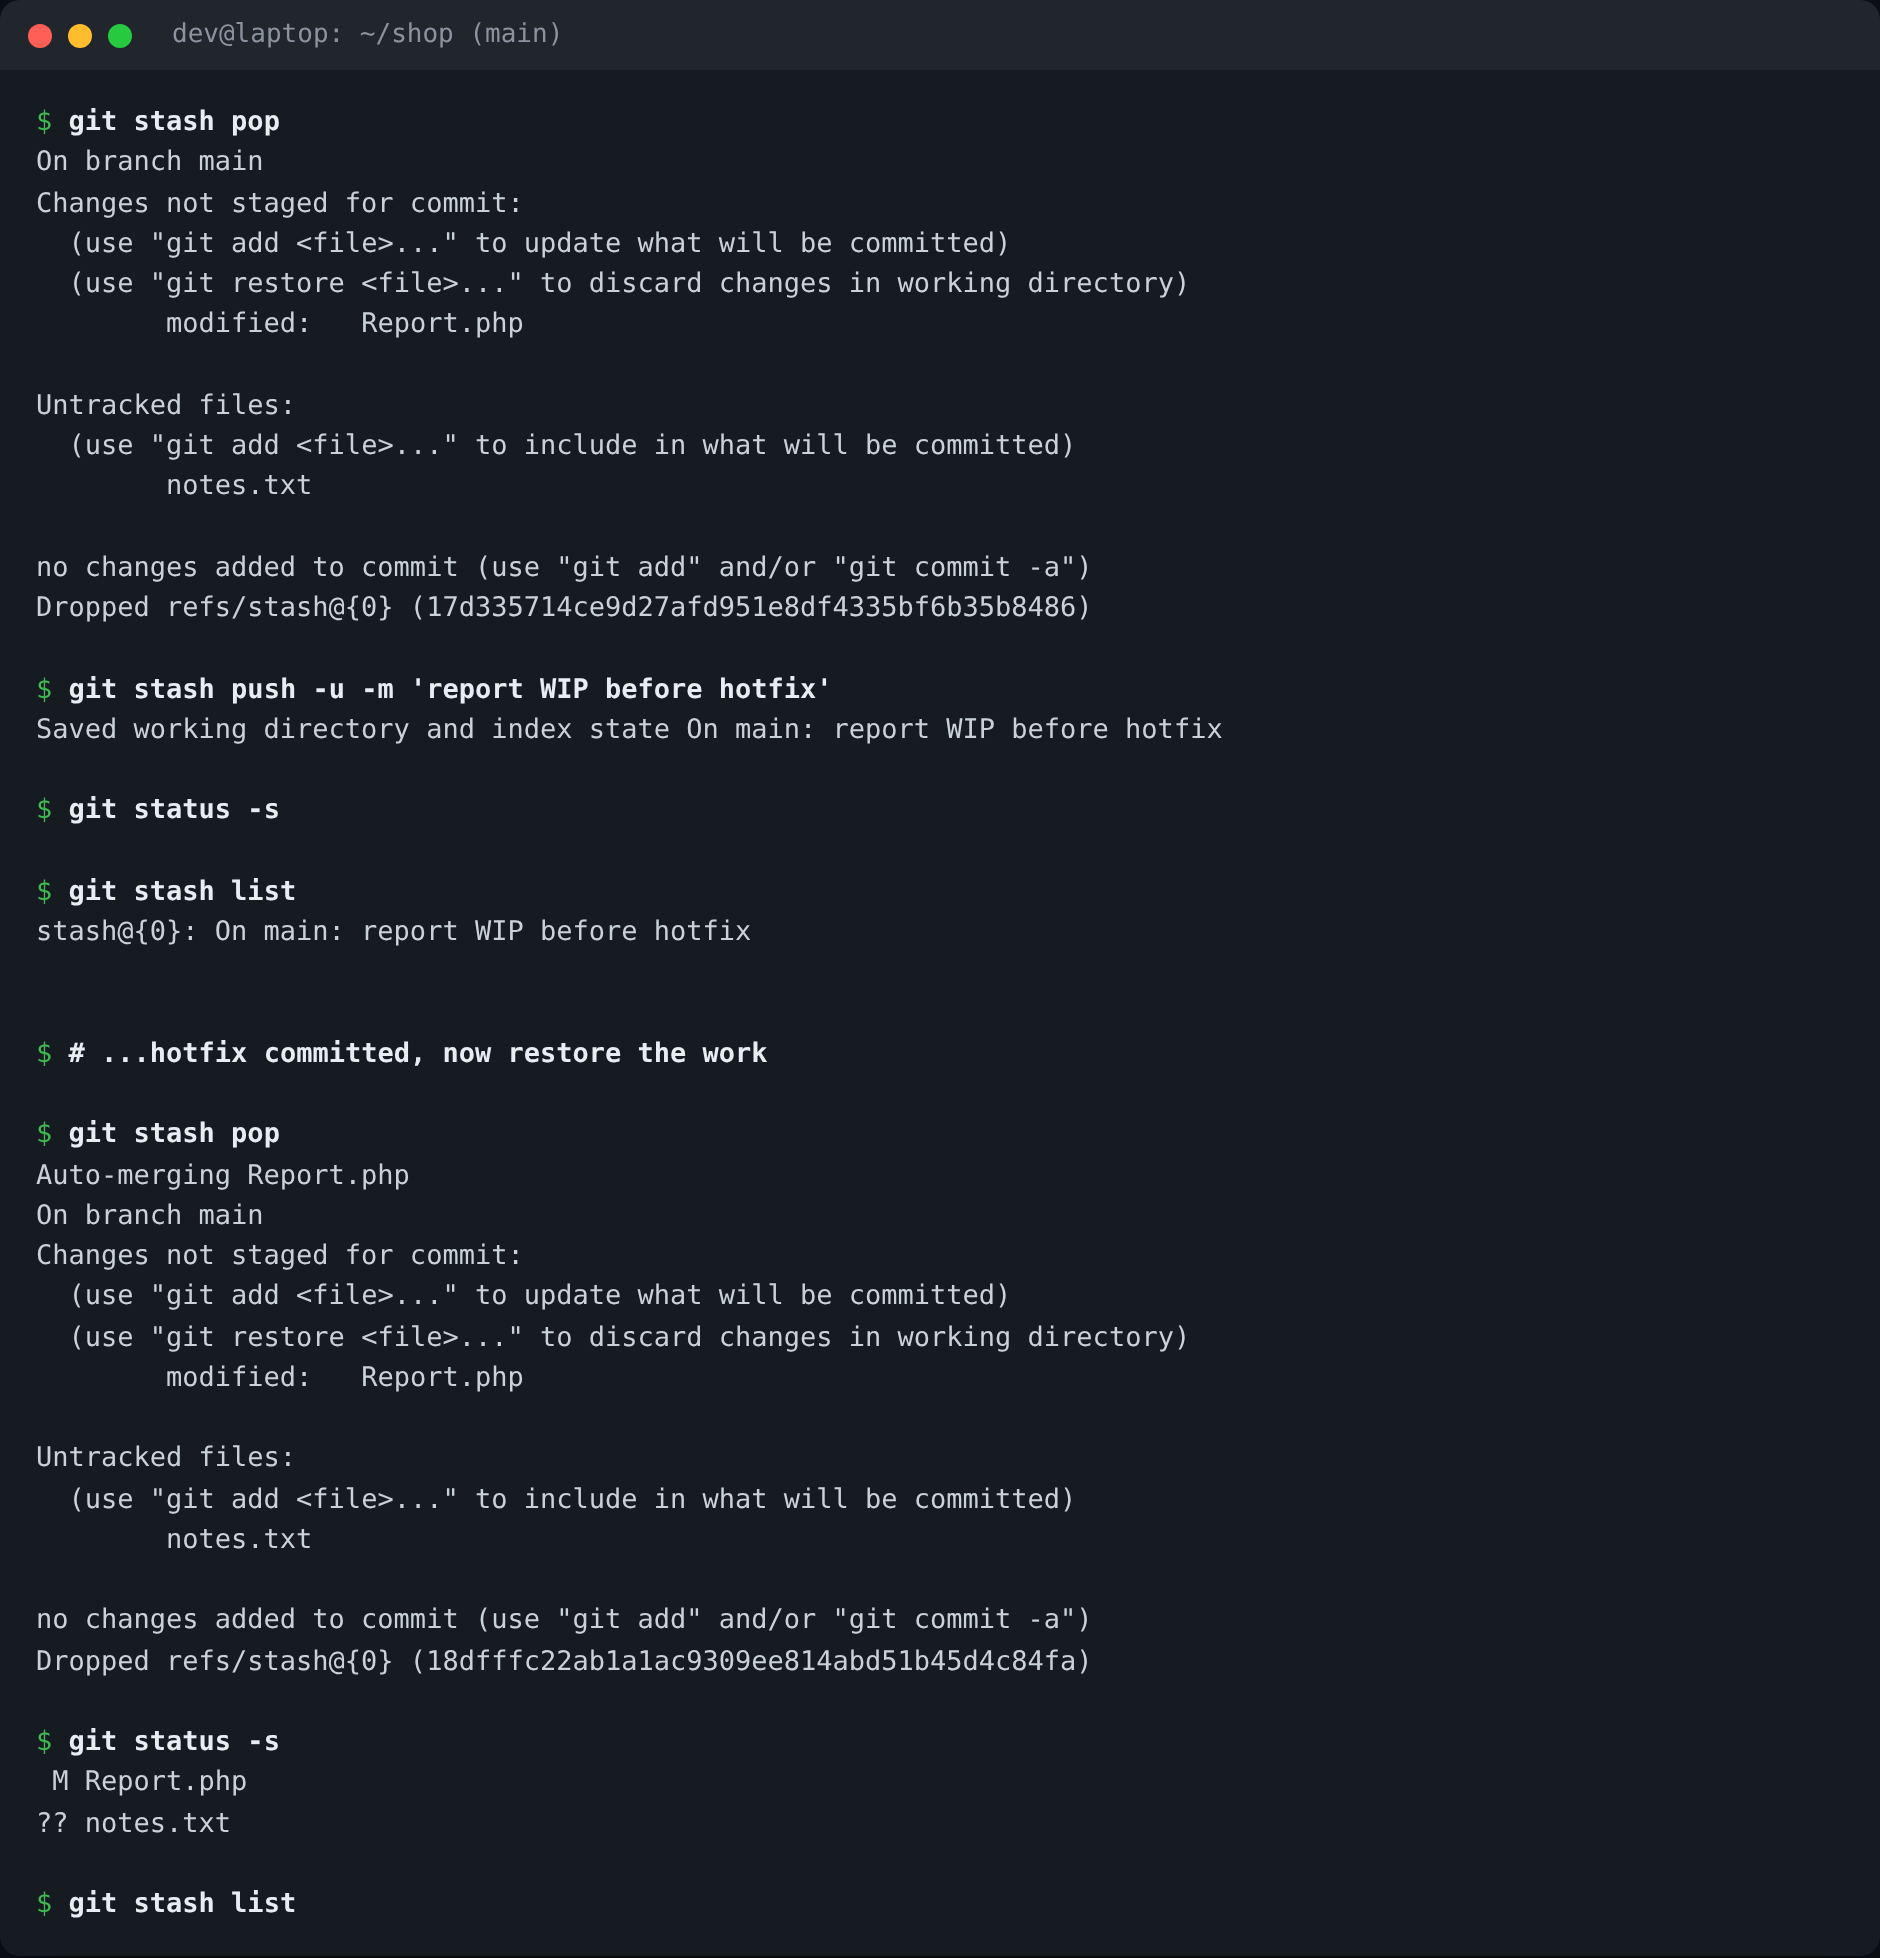
-u -m, commit the hotfix, then git stash pop. Git merged the stash into the new commit ("Auto-merging Report.php").pop vs apply
git stash pop re-applies the stash and then removes it from the list. git stash apply re-applies it and keeps the entry, which is handy when you want to apply the same changes to several branches. Both take a reference such as stash@{1}; the number is the position in git stash list, newest first.
Stash only some files
Put a pathspec after -- to stash just those files:
git stash push -m "only a.txt" -- a.txt
git status -s       # M b.txt  (b.txt was left alone)
When pop hits a conflict
If the code you are returning to changed in the same lines, pop conflicts, exactly like a merge in Part 3. The important safety feature: Git keeps the stash entry when a pop conflicts, so nothing is lost.
Resolve the file, git add it, then drop the entry yourself once you are sure it is applied: git stash drop. If it is easier to work on the stashed code in isolation, turn it into a branch:
git stash branch rescue-work stash@{0}That creates rescue-work from the commit the stash was made on, applies the changes there, and drops the stash on success. Because it starts from the original base, it can't conflict the way a pop onto a moved branch can.
Stash caveats
- It's easy to forget what you stashed. A stash named
WIP on mainfrom three weeks ago is a puzzle. Use-m, and checkgit stash listbefore ending your day. - Ignored files are not stashed unless you use
-a(--all). Files invendor/or.env(Part 2) stay put. - It's not a backup. Dropping a stash by accident is recoverable only through
git fsck, as with the dangling blobs in Part 5.
git cherry-pick: copy one commit to another branch
Say a rounding fix was committed on feature/discount, between unrelated work, and the release/1.0 branch needs just that fix. Merging the feature branch would drag everything along. cherry-pick re-applies one commit's changes on the branch you are on:
git switch release/1.0
git cherry-pick -x 6e8b681
git cherry-pick -x: the fix lands on release/1.0 as a new commit, with a "cherry picked from" line recording where it came from.Two things to note from that output. The new commit has a different hash (6e8b681 became 766ec36), because it's a new commit with a different parent. And -x appended (cherry picked from commit ...) to the message, which is worth using whenever you cherry-pick onto a shared or release branch, so people can trace the origin later.
Picking several commits
A range A..B excludes A and includes B. With three commits range 1, range 2, range 3 on src:
git cherry-pick src~2..srccopied range 2 and range 3, not range 1. Add -n (--no-commit) if you'd rather apply the changes to the working tree and commit them as one.
Conflicts while cherry-picking
--abort returns to a clean tree.Resolve and git add, then git cherry-pick --continue; skip the commit with --skip; or give up with --abort, which leaves the branch as it was before you started.
When not to cherry-pick
Cherry-pick duplicates a change under a different hash, so Git no longer sees the two commits as the same. If the original branch is later merged in, expect occasional confusing conflicts where both versions touched the same lines. It's the right tool for backporting a fix to a release branch; it's the wrong tool for routinely moving a whole feature between branches (that's what merge or rebase are for). If you are cherry-picking a merge commit, you need -m to pick the mainline parent, as with git revert in Part 5.
git worktree: two branches checked out at once
Stashing works, but it still forces you to flip one directory between branches, and rebuilding dependencies or restarting a dev server each time is a real cost. A worktree is a second working directory attached to the same repository, with its own checked-out branch:
git worktree add ../hotfix-wt -b hotfix/urgent release/1.0
git worktree list
Now ../hotfix-wt is a full working directory on hotfix/urgent, and your original directory is untouched, with all its uncommitted changes still in place. Commit in the worktree and the commit belongs to the shared repository; I committed Urgent hotfix there and git log hotfix/urgent from the main directory showed it immediately. There is no clone and no second copy of the history.
The refusal in the screenshot is a deliberate safeguard. A branch can only be checked out in one worktree at a time, because two directories moving the same branch pointer would corrupt each other's view. If you need to look at the same branch twice, check out a specific commit instead: git worktree add --detach ../peek <commit>.
Cleaning up
prunable).git worktree remove ../hotfix-wtdeletes the directory and its record. It refuses if the worktree has modified or untracked files (contains modified or untracked files, use --force to delete it); add--forceonly once you are sure.- If you delete a worktree directory manually, Git still remembers it.
git worktree listmarks itprunable, andgit worktree pruneclears the stale record. - The branch survives removing its worktree. Delete it separately with
git branch -d(Part 3) once it is merged.
One practical note for PHP and Node projects: ignored and untracked files, such as vendor/, node_modules/ and .env, are not part of a checkout, so a new worktree starts without them. Expect to run composer install or copy your .env into each worktree.
Common problems
| Symptom | Cause and fix |
|---|---|
| New file didn't get stashed | Untracked files are skipped. Use git stash push -u. |
stash pop conflicted; is my work gone? | No. The entry is kept. Resolve, then git stash drop. |
| Can't remember what a stash holds | git stash show -p stash@{n}; name future stashes with -m. |
| Cherry-picked commit shows a different hash | Expected: it's a new commit. Use -x to record the source. |
| Range cherry-pick missed the first commit | A..B excludes A. Use A~1..B to include it. |
fatal: 'main' is already used by worktree | A branch can be checked out once. Use another branch, or --detach. |
| Worktree folder deleted but still listed | Run git worktree prune. |
Before you move on
Use stash for short interruptions, and name your entries. Use cherry-pick with -x for backports, not for moving features around. Use a worktree when switching branches would disrupt a running build or a long task. And remember none of these are backups: commit early on a work-in-progress branch if the work matters.
References: git-stash, git-cherry-pick and git-worktree in the official Git documentation.
Related reading: Part 3: Git Merge Conflicts, Part 4: Git Rebase Explained and Part 5: Git Undo Commit.
Free resources for this topic
Get one practical tip every week
New tutorials, fixes and free cheat sheets from DEV Talk, straight to your inbox. No spam, unsubscribe in one click.
Free download: Git cheat sheet (PDF)
Have a question about this post?
Ask the community: other developers and the author can answer.
Get notified about new articles
One click, no email needed. Turn it off anytime with the bell at the top.
Get new articles on your iPhone
Add DEV Talk to your Home Screen, open it, then tap the bell.
Enjoying the content?
If this article helped you, you can support the author with a coffee. It keeps new posts coming.


Comments 0
No comments yet
Be the first to share your thoughts.